2048
May 17, 2023
Created by Zachary Kent (zak33) and Nadia Barakatain (nnb28)
Demonstration Video
Objective
We aimed to implement the classic mobile game of 2048 on the Raspberry Pi to be displayed on (and controlled by) the PiTFT. Further, it is clear that much of the future of embedded systems relies on cloud and IOT integration so that these devices can cooperate and communicate over long distances. To this end, we aimed for different players from arbitrary locations to compete and view each other's high scores, which would persist between different sessions.
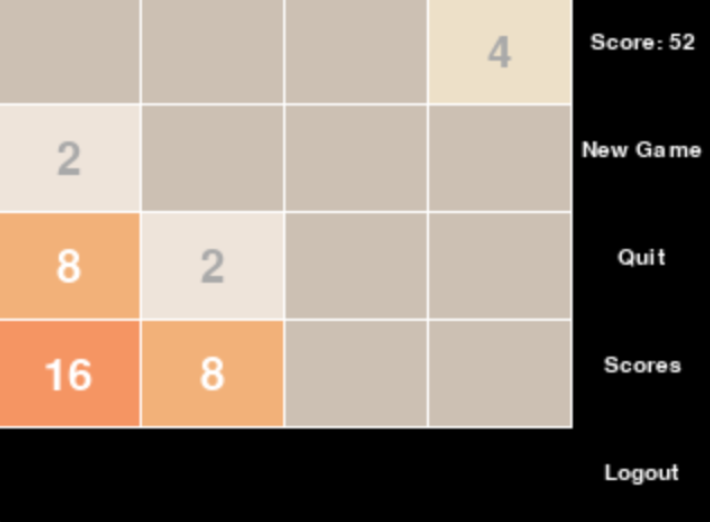
Figure 1: 2048 Gameplay
Introduction
For our final project, we decided to develop our spin on the classic game of 2048. In 2048, tiles labeled with powers of two are laid out on a 4 by 4 grid. You can shift all tiles up, down, left, or right until they collide with either another tile or the boundary of the grid. If two tiles labeled with the same tile collide, they are merged into a single tile, labeled with the double of the two individual tiles. You lose when the board fills completely with tiles and you can not make any other move to merge them. We aimed to implement 2048 so it was playable on the PiTFT and could be controlled using either the 4 tactile buttons or WASD on an external keyboard. Further, we wanted the player's high score to persist across different sessions, and we also wanted each player to be able to view the high scores of other players playing on different machines. We implemented both the game logic and the GUI in Python (using the pygame library), while we implemented persistent high scores by recording this information in Cloud Firestore. Overall, we believe that we were successful in our goal of creating a fundamentally embedded system integrated with the cloud and IOT.
Design & Testing
We took a top-down approach to designing our system, meaning that we broke larger systems into progressively smaller child systems. This allowed us to work independently on many aspects of the project, increasing our efficiency and the degree of “parallelism” to our workflow. Of course, these subsystems would eventually have to interact with each other, but we could instead “stub-in” lightweight interfaces between them to be implemented later. Being forced to develop these subsystems also allowed them to be decoupled, so that the implementation of one could be changed without affecting the other. We decided to break down our application into 3 smaller subsystems: the GUI, the game logic, and the backend database. We will now describe the design and testing of each of these subsystems in detail.
Game Logic
Design
Our game logic for 2048 needed to encapsulate the abstract logic of 2048, including the positions of different tiles and how they are moved/merged when the board is shifted in different directions. To this end, we created a class “Board” which represents an abstract square board in 2048. Although a typical 2048 board is only 4 by 4, we parameterized this board over its side length so we could potentially support larger boards in the future. We represented a board using a matrix whose entries represent the values of the corresponding tiles. Then, we added methods to this class representing the different actions you would perform on a board while playing the game. For example, we added ashift method that would shift the board in a given direction. This was a
non-trivial task,
as the semantics for shifting tiles are somewhat contrived. Further, we did not want to
duplicate code for shifting the board in different directions, as this would make the code more difficult to
maintain and fragile to change; the code for shifting the board in different directions would be fundamentally
coupled depending on the semantics we had prescribed. In order to minimize code duplication, we decided to only
implement the logic for shifting the board left; to shift the board in other directions, we could instead rotate
the board, shift it to the left, and rotate it back. We developed the following rules for shifting the tiles in
different directions:
- To shift the board up, rotate the board 90 degrees counterclockwise, shift the board left, and rotate the board back 90 degrees clockwise
- To shift the board down, rotate the board 90 degrees clockwise, shift the board left, and rotate the board back 90 degrees counterclockwise
- To shift the board right, rotate the board 180 degrees counterclockwise, shift the board left, and rotate the board back 180 degrees clockwise
Then, to complete the implementation of shifting the board, all that remained was to implement the functionality for shifting the board left. We “reverse-engineered” the semantics of shifting a 2048 board by playing 2048 online and recording how different edge cases are handled. This ensured that our game logic would match that of the original as closely as possible. Through this testing, we determined that shifting a row of tiles left adheres to the following rules:
- First, move all tiles in a row left as far as possible until they are all adjacent.
- Merge adjacent tiles of equal value into one of double value left to right. Tiles that were already merged into a tile of larger value should not be merged again.
Because every row was represented as an array of tiles, this algorithm could be implemented using a simple
python loop where we considered adjacent tiles by inspecting tiles at indices i and i + 1 for
i = 0..n, where n denotes the side length of the board. To avoid implementing tedious
matrix rotations ourselves, we decided to represent the board using a numpy
array, allowing us to use built-in numpy rotations. With the ability to shift a board left and rotate the board
to an arbitrary degree, we were able to complete our implementation of shift.
The other large component of the game logic included score tracking, which was also somewhat nontrivial to implement. Through empirical testing, we determined that every time you shift the board, your score increases by the sum of the tiles that are merged. In order to implement this logic, we compared the board before shifting and the board after shifting, flattening both into lists of tiles. Then, the score increase from shifting the board is equal to the sum of the tiles in the difference of the shifted board's tiles and the original board's tiles. This works because the only tiles that will be added to the board when shifting are those that are merged to create doubled tiles, and the total score increase is the sum of these merged tiles.
Finally, we implemented the logic for when determining when a game has ended. After more empirical
experimentation, we determined that you lose in 2048 when the board is full and you can make no move to merge
any tiles. In order to compute this losing condition, we checked whether shifting the board up, down, left, and
right resulted in no change to the board's contents. This completed our implementation of the game logic, which
could then be accessed by the GUI using the Board class and its high level methods.
Testing
Comprehensive testing was critical to ensure the correctness of both the game logic and our application as a whole. Uncaught bugs in the game logic code would likely bubble up into the GUI to be viewed by the player. This would make them very hard to diagnose, as such a bug could have originated from any of our 3 different subsystems.
In order to ensure that this did not happen, we employed thorough unit testing of our game logic, which was very amenable to assertion-based testing. For example, we wrote several unit tests that asserted shifting a particular board configuration in a specified direction resulted in the correct output board configuration. Unit tests are especially useful in testing the correctness of different edge cases, many of which we considered while writing the logic code itself. Having a fully automated test suite further allowed us to ensure that we did not inadvertently introduce any regressions into our code, which would have also been difficult to spot and correct. We wrote the unit tests themselves using the pytest framework, a very lightweight and well-maintained unit-testing framework for Python.
Backend
Design
Our backend needed to support accesses and persistent updates to users' high scores. Further, we needed to authenticate users so that a bad actor could not change another user's score. These two requirements are somewhat fundamentally coupled, as we need to save users' usernames and passwords in persistent storage. However, it would also be highly insecure to store users' passwords in plaintext in our database, as sensitive data would be exposed if our database were compromised. Additionally, we had to consider how the GUI would interact with the frontend, which presented the choice of whether or not to implement a serverless backend. Thus, implementing a secure backend was a non-trivial challenge; we now describe and justify the design decisions we made.
Traditional or Serverless?
Initially, we had wished to use a serverless backend; i.e. one where the GUI interacts with the database directly, as opposed to using a deployed API as a middleman. We elected to use Firebase, the serverless backend we were most familiar with. However, we almost immediately ran into issues when we learned that Firebase does not support desktop applications. This forced us to pivot to a more flexible server-based backend. In this scheme, we would write a REST API that would be deployed on a server; this service would accept and authenticate incoming HTTP requests and interact with the database on the requester's behalf. The GUI would then only interact with the database indirectly by making HTTP requests to our service, a much more flexible interface. This architecture is displayed in figure 2.
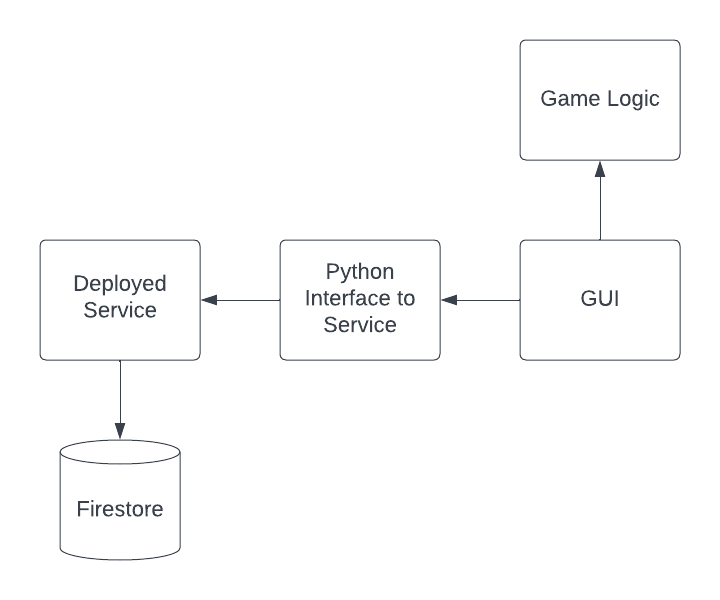
Figure 2: Architecture with a Traditional Backend
Language Choice
This approach came with other unexpected benefits as well. If we were to employ a serverless backend, all of the code for interacting with the database would have to be written in Python as well. One could imagine using an FFI to support multiple languages, but this likely would be tedious and error-prone. Instead, using a traditional backend allowed us to write our service in any language we wished, as this code would be completely independent from that of the GUI.
With this freedom in hand, we decided to implement the backend in TypeScript, a statically typed superset of JavaScript. This allowed us to take advantage of the rich JavaScript web ecosystem while still enjoying the benefits of type-safety. Further, TypeScript has excellent support for asynchronous operations (implemented with the Promise API) that were extremely useful when performing high-latency network operations, like interacting with the database.
Authentication
Authentication is also an objectively difficult problem to solve with many reasonable solutions. As discussed, we
needed to store users' passwords in some shape to ensure that users of the app can only login if they have the
correct credentials. To avoid storing them in plain-text, we hashed the user's passwords before storing them in
the database using the bcrypt algorithm implemented in the bcrypt.js library. Then, when we would
authenticate a
user's login credentials, we would hash the provided password and check that it matches the hashed password
recorded for that user in the database. This does mean, however, that we were transmitting users' passwords
directly from the GUI to the service. We prevented an attacker from intercepting users' plaintext passwords by
using the HTTPS protocol to ensure that this network traffic was encrypted.
Additionally, we wanted to avoid sending the users' passwords every single time they wanted to perform some privileged operation, such as updating their high score. The typical scheme to address this problem involves sending the user an access token once their login credentials have first been authenticated. Then, the user can include this private access token in future requests to perform privileged operations as opposed to repeatedly sending their login credentials. We decided to use JSON Web Tokens to tackle this problem. Given a secret key, JSON web tokens allow you to encrypt some information, such as a username, into an access token; this process is called “signing” the token. This token can then be decrypted to get this information back; this process is called “validating” the token. This process is depicted in figure 3. We applied this technology by signing a web token when a user first logs in and then sending it back to the user via an HTTP response. Then, when a user attempts to perform a privileged operation, like changing their high score, they must include this token in their request. The server then validates this token to ensure that the request is not impersonating another user. Overall, we were highly pleased with how this scheme allowed our authentication to be both secure and elegant.
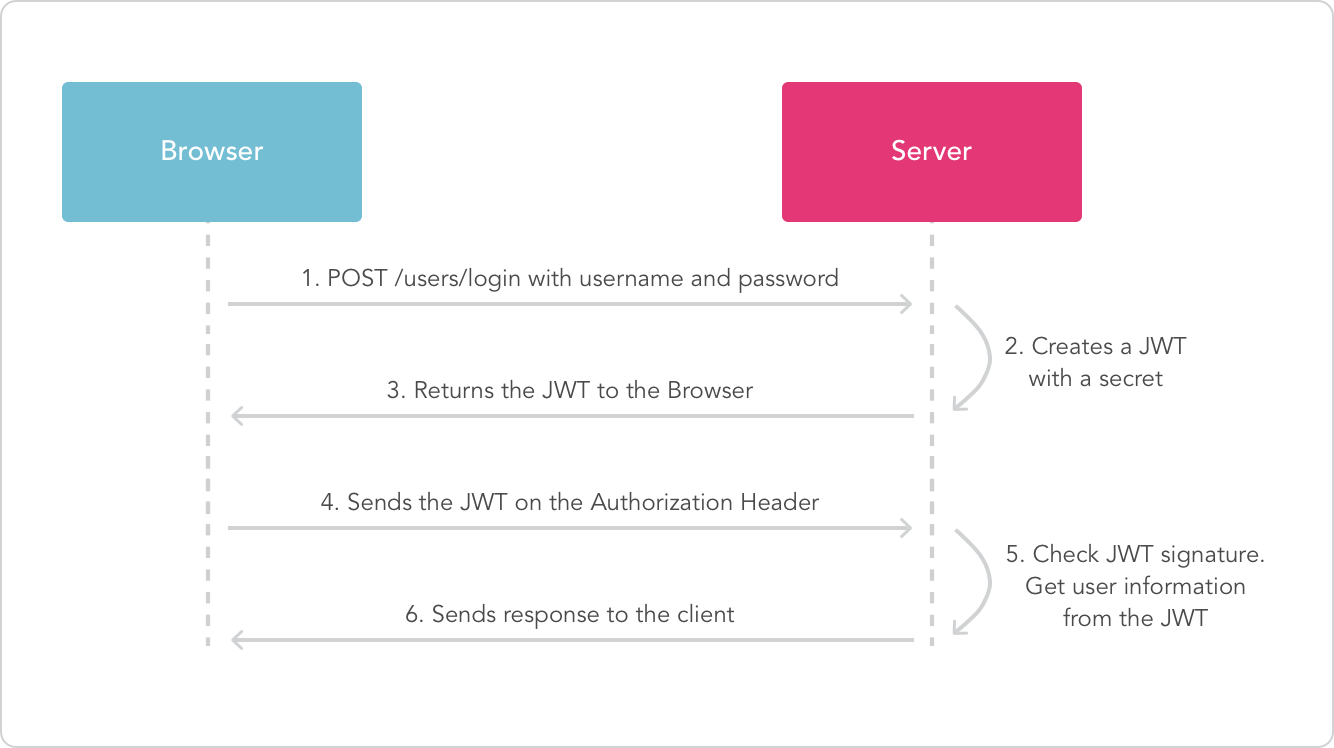
Figure 3: JWT Authentication Cycle. Source.
Interacting with the Database
Although we were not able to use Firestore on a desktop application, we still elected to use it as our database
due to our familiarity with it. A Firestore database comprises a number of different collections, each of which
can contain documents that store data or more nested collections. Because our use case is fairly simple, we
decided that we would only need one collection called users that contains documents recording each
user's data:
their high score and password. We use the user's ID as the unique key for their document containing this data, as
we maintain that duplicate usernames are not allowed. This schema is depicted in figure 4.
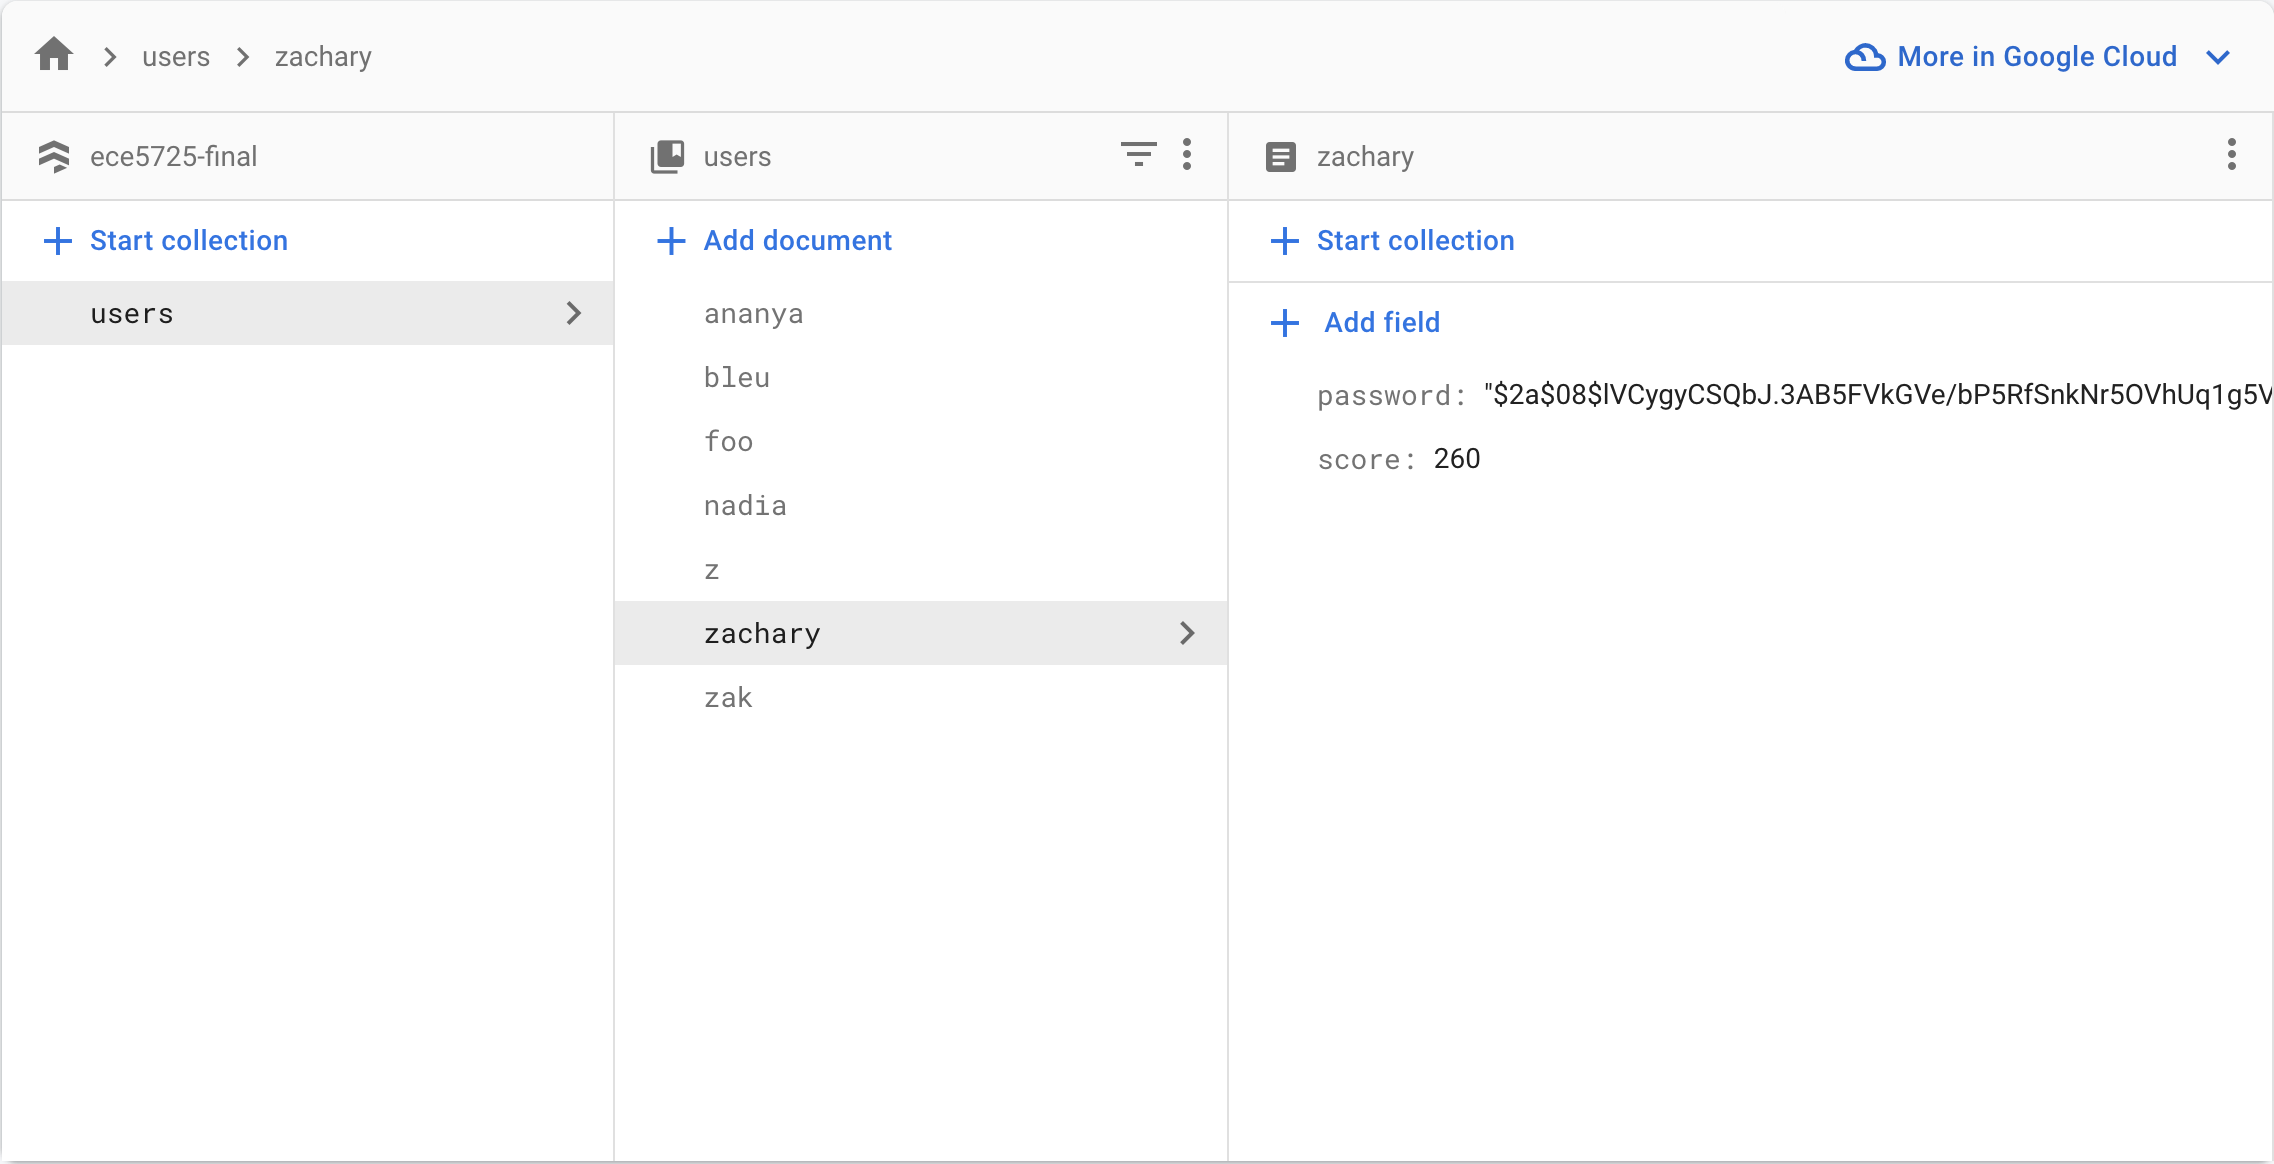
Figure 4: Firestore
To implement functions that would directly interact with the Firestore directly, we had to use the Firebase Admin SDK, which was explicitly created for server-side use. This allowed our code to access Firebase using a “service account,” a secret key formatted as a JSON. We wrote different functions corresponding to the stateful actions a user would perform while playing the game. These included the following:
- Creating an account. For this action, we implemented a function
registerthat takes a username and password and creates a new document in theuserscollection identified by that username. We then record the user's hashed password and a default high score of 0 in the newly created document. If a document with that username already exists, then we throw an error. - Logging in to receive an access token. For this action, we created a function
loginthat takes a username and unencrypted password and returns an access token for that user, if their credentials are correct. We look up the user's document in theusersFirestore collection to view that user's hashed password; we then verify the provided password using the method described in the Authentication section. If the user's account has not yet been created or the provided password is incorrect, then we throw an error. - Retrieving a single user's high score. We developed a function
highScorethat takes a username and returns the high score of the associated account. To accomplish this, we just looked up the document in the users collection associated with the provided username; if it does not exist, then that user's account has not yet been created and we throw an error. - Setting a user's high score. To implement this functionality, we wrote a function
setHighScorethat took a username and the new high score as arguments. We then looked up this user's document in theuserscollection and updated the property of that document that tracks the high score. Like in the previous function, if this document does not exist then we throw an error. - Retrieving the top high scores. To implement a leaderboard, we needed to be able to retrieve the top high
scores across all users. We developed a function
highScoresthat takes an optional parametermaxindicating the maximum number of high scores to be returned. This was an excellent use case for Firestore “queries,” which emulate functionality of SQL databases. Specifically, we created a query that would first sort the user collection in descending order by high score and then take the firstmaxhigh scores. Ifmaxwas not provided, then we just return all of the high scores ranked in descending order.
These functions comprised our service's interface to the database, allowing the service itself to interact with the database only indirectly through these functions. This allowed us to encapsulate the database itself; later, we could swap our database completely to something like MongoDB and just change the implementation of these core functions. Provided the new implementations still respect their specification, the users of these functions would not have to modify their code at all.
API
Having decided that we would employ a traditional server-based backend, we now needed to settle upon a well-defined API (application programming interface) for our service. We created an endpoint for every user action described in the previous section, but no more; we wanted our API to be as simple as possible. We prescribe that the input information to each action must be provided in the request body, while the output of the action is returned through the response body. We wrote and generated the following documentation for our API using Swagger UI; it is also publicly available through navigating to the /docs endpoint, as shown in figure 5.
Figure 5: Swagger documentation of our API
Service Implementation
Having made all of these design decisions, we were now ready to actually implement our backend in TypeScript. We decided to use the Express framework to generate routes for our service, which is probably the most common and well-maintained solution available. We first created an instance of an Express application and then attached different routes to it; an Express instance has a method for each type of HTTP request. These methods accept both the literal route itself and a callback that will be called when that request to the route is made. This callback accepts both the HTTP request and the HTTP response instance. Translating our OpenAPI specification into a functional express application was not difficult once we had fully planned out every endpoint we needed to create. As described in the previous section, every endpoint corresponds almost exactly to a single core function that interacts with the database
When each of these endpoints are accessed, we will invoke the corresponding function developed in the previous
section; for example, we would call the login function when the “/login” endpoint is accessed. In
order to do
this, the requester must include the necessary information in either the request body or query parameters when
accessing an endpoint. Considering again the “/login” endpoint, the requester must include a username and password
in the request body to pass as arguments to the login function. Then, we would send the result
returned by this
function (if any) in the response body with a 200 status code on success, a 400 error code if required information
was not provided in the request body, and a 401 error code if we were unable to authenticate the user for a
privileged operation. This completed our implementation of the service.
Service Deoplyment
We deployed our API using Heroku, which hosts our service publicly at https://ece5725.herokuapp.com/. Deploying
with Heroku is fairly simple, although there was some setup involved. Firstly, as far as we know, Heroku cannot
interpret TypeScript programs directly. This meant that we first had to compile our TypeScript code to JavaScript
using the tsc compiler that would be directly interpreted by heroku. In order to do this, we
specified that
Heroku should invoke the TypeScript compiler after building our package with a postinstall script. We also had to
inject secret keys, including the Firebase service account and JSON web token secret key, into Heroku's runtime
environment. Heroku offers excellent Git integration that allows us to deploy by simply pushing to a remote
repository hosted by them.
Interface to GUI
The GUI needed to interact with the service by making HTTP requests to its various endpoints using the ‘requests' library. We wanted to, however, encapsulate our service similar to how we encapsulated our database. As we did before, we developed a lightweight wrapper around the actual HTTP requests to our service. We also wanted to encapsulate the authentication scheme we were using; forcing the GUI to explicitly pass around access tokens would have broken encapsulation. Overall, we aimed to design the interface to the GUI so that the service could be drop-in replaced with another backend solution, such as a serverless backend.
This motivated us to develop a ‘User' class which represents an abstract user of 2048. The constructor of this
class takes a username and password, makes a POST request to the “/login” endpoint with these credentials in the
request body, and saves the resulting access token from the response body to the object's state. If the response
from the endpoint is not 200, then this means the login failed, and the constructor throws a custom
InvalidCredentialsError.
Then, we added a high_score method to the User class that fetches and returns the high score of the
associated
user. We implemented this by making a GET request to the “/high-score” endpoint where the ‘x-access-token' header
is set to the access token saved in the User instance's state. This demonstrates how we were able to successfully
encapsulate the access token within the User class.
Similarly, we developed a method set_high_score that updates a user's high score in the database. To
implement
this, we made a POST request to the “/high-score” endpoint including the provided score in the request body and,
again, the user's access token in the ‘x-access-token' header.
We also had to develop some functions that were not associated with a User instance. For example, we developed a
standalone function create_account that takes a username and password as arguments and attempts to
create an
account with the given credentials, returning True on success and False on failure. The
implementation of this
function was fairly simple; we made a POST request to the “/register” endpoint with the provided username and
password in the request body. If the response status code is 200, then we return True; otherwise, we
return
False.
Finally, we developed a function all_high_scores that takes an optional argument limit
and returns at most
limit top high scores, ranked in descending order. Again the implementation of this function was
fairly simple;
it makes a GET request to the “/high-score/rankings” endpoint. If the optional limit argument is
provided, we
also include this as a query parameter to the GET request. We then return the list of high scores from the
response body. This completed the lightweight implementation of the interface between our service and the GUI.
Testing
Testing our service was imperative in ensuring that our endpoints functioned correctly. We made extensive use of Postman to test our API. Postman allows you to create and save HTTP requests to be run systematically at different times. This was especially useful when we were first developing our service and we were running it locally. We used Postman to make requests to port 8080 on our local machine before actually deploying it to ensure that we did not deploy broken code. We used our OpenAPI specification to guide the cases we tested; our documentation enumerated all valid request schemas for an endpoint and also different classes of invalid requests. This motivated us to test the following properties for every endpoint:
- Every valid request sends back the correct response with all required information in the body.
- Every invalid request sends back the status code specified by our OpenAPI documentation.
For example, we tested that a POST request to the “/login” endpoint with an existing username and correct password resulted in a response containing an access token. We then used this access token when testing other endpoints that required them to authenticate the user, such as a POST request to the “/high-score” endpoint. We also tested that omitting required information from the body of a POST request to the “/login” endpoint resulted in a 400 response, and providing invalid credentials resulted in a 401 response. We demonstrate how we used Postman to this end in figure 6.
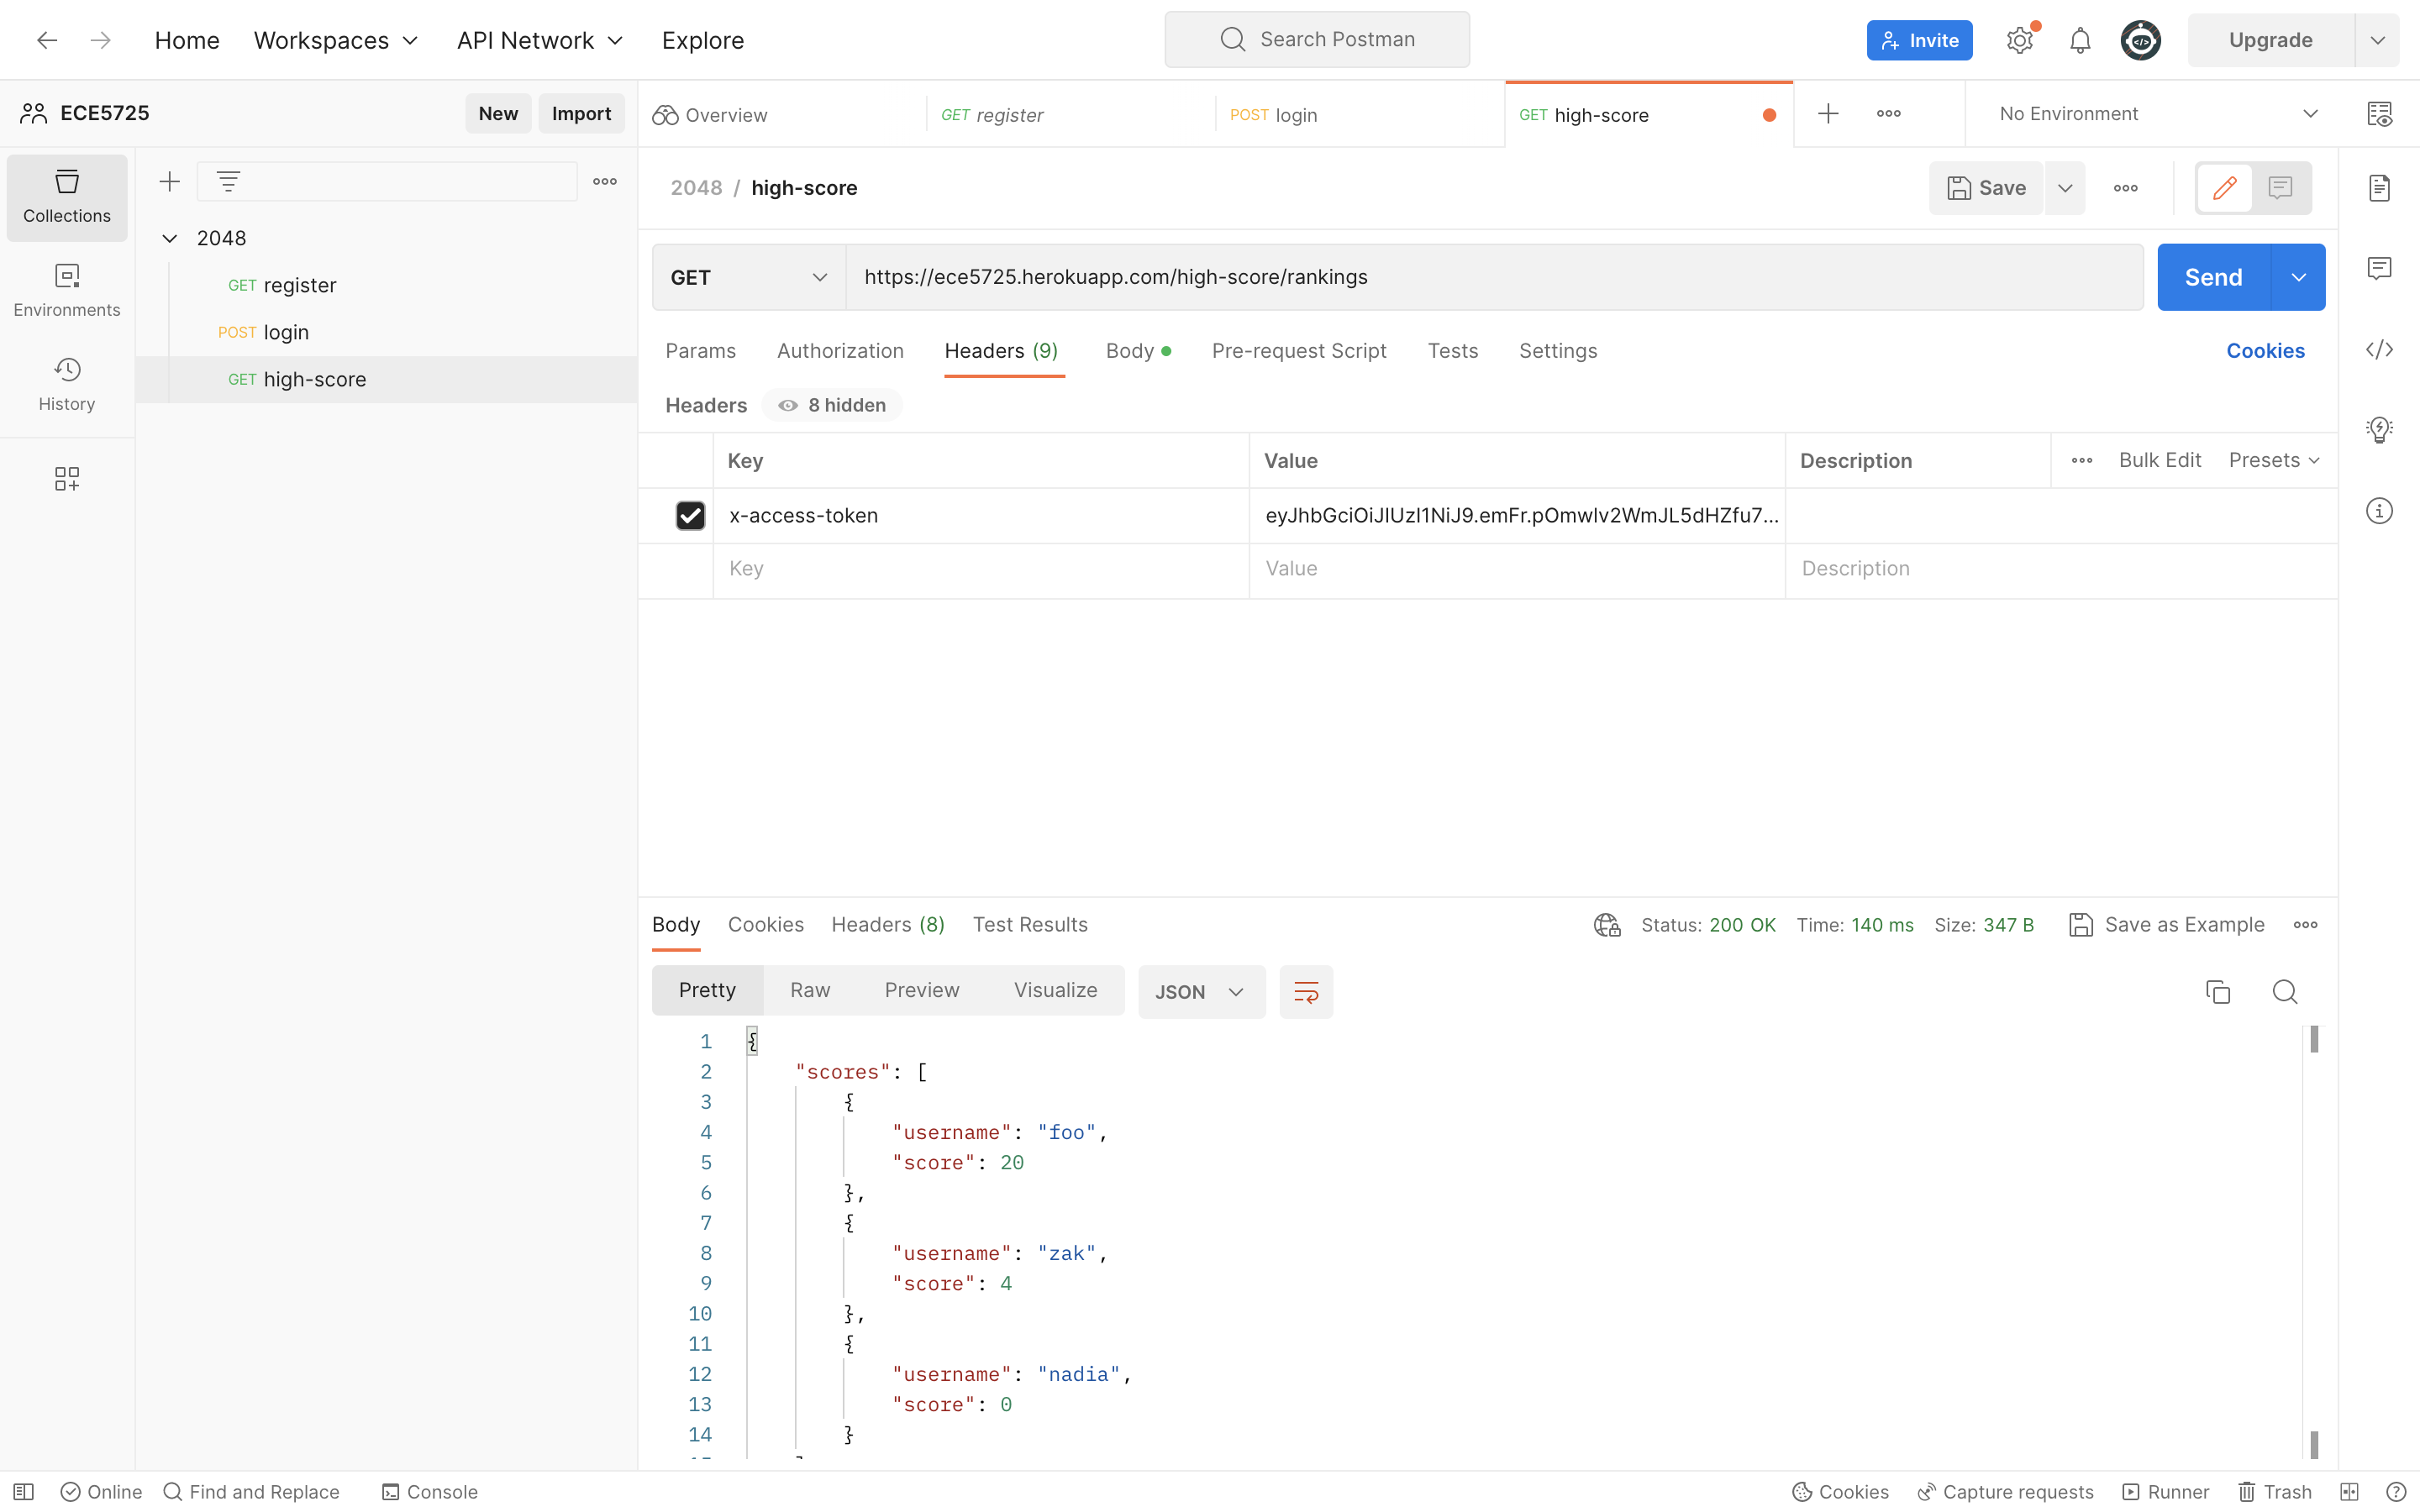
Figure 6: Testing our API with Postman
GUI
Design
Our GUI was designed using the pygame library, consisting of three views: the login page, the game screen, and the leaderboard.
Game Screen
We began by first designing the GUI for the game screen by displaying a square grid with a default size of four
by four, which could be changed when specified by the user. This was implemented using a draw method,
created
inside of the Board class, which when called, displays the current state of the board. This ‘draw’
method loops
through each spot inside of the board matrix to access its corresponding value and, subsequently, associate the
tile’s value with its corresponding tile color to ultimately display the grid of colored, number tiles on the
pygame screen. In order to interactively update the player’s view, we redrew the board in every iteration of the
game’s main loop, ensuring that the user would be able to see the tiles shift and therefore, the board change in
response to their input of the direction to shift the tiles.
To the right of the board, we displayed these five items: the player’s current score, a “New Game” button, a
“Quit” button, a “Scores” button, and a “Logout” button. The player’s current score is a value calculated in the
Board class each time the player shifts the tiles in a direction. This value was then accessed to
display to the
player how their progress in the game is going. The “New Game” button, when pressed, refreshes the board by
assigning the board object to an empty board, randomly adds a new tile of the value two or four, and in the next
iteration of the main game loop, this new game board is displayed using the draw method described
above. The
“Quit” button, when pressed, terminates the game. Clicking this button is the only way that the user is able to
exit the game. The “Scores” button, when pressed, navigates to a new view of the game, called the “Leaderboard,”
where the top seven players are displayed with their respective scores to allow players of the game to see how
their skill might compare with other players in the game. Finally, the “Logout” button, when clicked, interacts
with the API to log the user out of their session and navigates to the “Login Screen” to allow the user to either
login again or to allow another user to create an account or login.
Figure 7: Game Screen
Login Screen
After completing the implementation of the “Game Screen,” we next designed the GUI for the “Login Screen,” the
view which allows the user to input a username and password in order to either create an account, or to log into
their existing account, and to then begin playing the game. We implemented this by creating a new class called
Login in order to modularize our code, and allow the main function to call only the necessary
functions when
displaying the login screen. Inside of the Login class, we created a ‘draw’ method, which when
called, uses
pygame to display the current state of all of the login screen components to the user.
Implementing the username and password textboxes and allowing for user input while also displaying this input
interactively was the trickiest part. In order to do so, we initially created and displayed two rectangular boxes,
which change color based on whether they had been the most recently clicked item on the screen, onto the pygame
window. After doing this, we used the current state of the user’s input of their username and their password,
which is handled in the Login’ class’s handle_events method, in order to create two new
respective pygame
Rects. Displayed beneath the two text boxes are two buttons: the button “Login” and the button “Create Account.”
The ‘Login’ button acts as a navigation button, which navigates to the ‘Game Screen’ if the username and password
entered are verified using the API as existing and correct. If the API indicates that the username and password
entered are not correct, then the “Login” button does not navigate to the “Game Screen,” and instead, “Incorrect
username or password” is displayed below the “Login” and “Create Account” buttons to communicate with the user
that what they have entered does not correspond with an account in the database. The “Create Account” button
serves as a way for the user to interact with the database to create a new account. If a new account is
successfully made, then the message “Success!” is displayed. If an account that already exists is attempted to be
created, nothing is displayed, indicating that there has been no change in the database. Once an account has been
successfully created, the user can click the “Login” button to then successfully login and navigate to the “Game
Screen.” We called this draw method of the Login class inside of the main code, and
while the user was in the
“Login Screen”, we called it on each iteration of the main game’s loop, allowing for the text being displayed in
the username and password box to be interactive with the user’s keyboard input.
Taking in the text input from the user to then be displayed using the draw method was handled inside
of the
handle_events method of the Login class. The handle_events method, when
called, uses pygame to loop through
all events detected from the user interacting with the GUI to do different actions based on the event.
Specifically for the text boxes, we looped through all keyboard events. If a keyboard event was detected, the
handle_events method of the Login class checks if it came from the keyboard’s backspace
button. If so, then
the method takes out the last character in either the username text or the password text, depending on which one
was selected. If, instead, a keyboard event was detected but not from the keyboard’s backspace buttons, then the
handle_events method concatenates the detected unicode character to the end of the username text
string or the
password text string, depending on which one was selected. If, instead, neither the username nor the password text
boxes were selected in the GUI, then a keyboard event results in no change to either of their text strings. The
handle_events method of the Login class also detects mouse click events to check for if
the “Login” button or
the “Create Account” button were clicked, and presents new messages or views to the user, as described above.
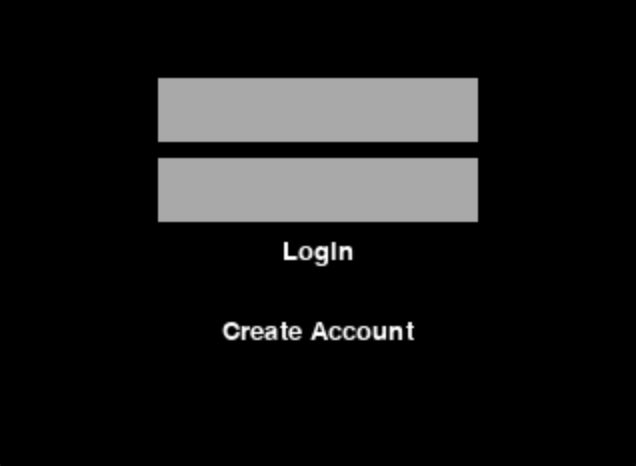
Figure 8: Login Screen
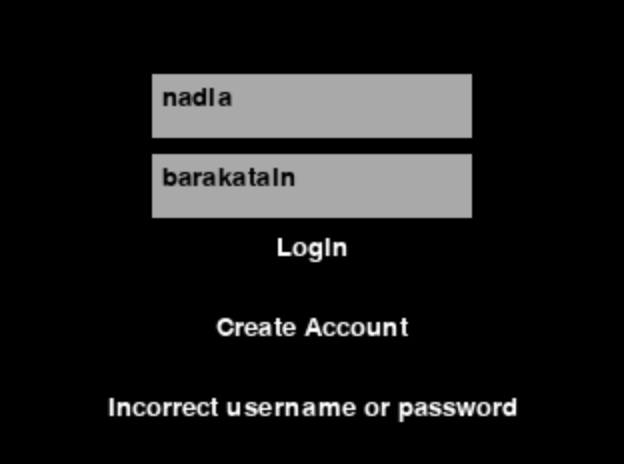
Figure 9: Attempting to Login With Invalid Credentials
Leaderboard
Finally, we implemented the “Leaderboard,” the view that allows any user to see how their scores compare with the
top seven highest scores. The “Leaderboard” screen can be reached from the “Game Screen” view by clicking the
“Scores” button. After clicking the “Scores” button, the user navigates to this new screen where they are able to
see the highest seven scores and the usernames of the corresponding player who reached these scores, as well as a
“Back” button, which when clicked allows them to navigate back to the “Game Screen” and continue their progress in
their current game. We implemented this by creating a Leaderboard class which consists of a ‘draw’
method and a
handle_events method. The handle_events method only checks for the event that the “Back”
button has been
clicked. In the case of this event, it navigates the view back to the “Game Screen.” The draw method
uses the
all_high_scores method from the API to get the seven highest scores. After getting these scores, the
draw
method loops through the scores in order to display the usernames and their corresponding highest scores using
pygame.
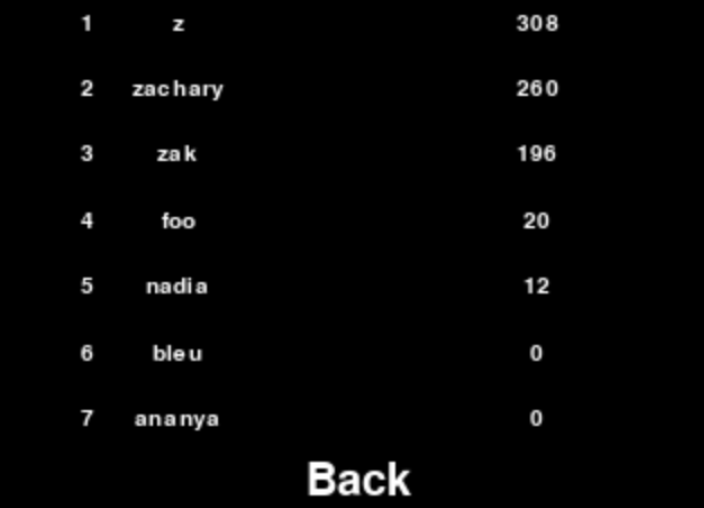
Figure 10: Leaderboard
Testing
Testing our GUI was very important to ensure that the users are able to properly interact with the game and ultimately play 2048. We tested the GUI using our local computers, initializing the size of the pygame window to the size of the piTFT screen in order to simulate the user playing the game using the piTFT and to allow for quick feedback and turn around time. Each change that was made on the GUI was then checked by running the game in the pygame window to ensure that the change worked and that we could safely move to implementing the next feature of the GUI. This process allowed us to catch any errors quickly and prevent them from creating issues with the next features implemented. After ensuring that the GUI properly worked on our local computers, we then began testing the GUI and the user interaction on the piTFT to troubleshoot any outstanding issues. After the completion of extensively testing the GUI on both our local computers as well as the piTFT, we were able to ensure the correctness of our GUI implementation.
Results
Overall, we were highly pleased with the outcome of our project; we were able to successfully develop a 2048 game playable on the Raspberry Pi and found that every subsystem worked correctly. You could create an account, login, play 2048 using the tactile switches, and save your high score for viewing on a different device. Thus, we were able to accomplish all of our baseline goals and most of our stretch goals.
However, we did encounter several issues along the way, some of which were difficult to debug. One particular defeating instance was when we first deployed the service to Heroku and it immediately crashed; this was especially confusing to us because we had extensively tested the service locally before deploying it. Upon viewing the logs, we found a cryptic error that stated the Firebase service account was invalid even though we had injected it into the runtime environment. Upon some debugging, we found that Heroku had injected it into the runtime environment as a raw string, which in hindsight was to be expected. This was, however, solved easily by parsing the service account injected into the runtime environment.
While conducting local testing of our service, we also found that the response of the “/high-score/rankings” endpoint was incorrect; instead of returning an array of scores, it was returning an empty object. Upon debugging, we found that we were actually sending a Promise wrapping the scores in the response. This issue was again easily fixed by waiting for the promise to resolve with the scores before sending them in the response.
Beyond these relatively minor issues, however, most aspects of our project were very smooth. We were able to quickly and effectively debug all issues we encountered, a testament to our thorough testing and documentation.
Conclusion
Overall, building 2048 to be played on the Raspberry Pi proved to be an insightful experience in building embedded systems integrated with the cloud. We were not able to gain experience with cloud integration in other labs in the class, so this project demonstrated that it was both relatively painless to achieve and extremely fruitful. Cloud integration opened up our project to limitless possibilities while also presenting many interesting design challenges. Tracking high scores was only one application of cloud integration; it would likely not be difficult to add other network-forward features. Further, we were pleasantly surprised with the effectiveness of our traditional server-based backend, as it allowed our systems to be even more decoupled than they would have with a serverless backend. Generally, we found that encapsulating different parts of our technology stack allowed us to isolate our different subsystems and write clearer code that interfaced between them. This allowed us in turn to be maximally productive; both of us could work on completely decoupled code. Had we not been able to do this, we likely would not have been able to accomplish all of our stretch goals.
Future Work
Now that we have added cloud integration to our 2048 game, there are many possible avenues of future features, both hardware and software-central. One of our stretch goals that we did not end up implementing was realtime competition between players on different devices. In this scheme, different players from remote locations could view each other's moves in real time and the first player to reach 2048 would win. This would likely be difficult to implement smoothly due to network latencies, but we would likely attempt to do so using the WebSockets protocol. In contrast to HTTP, communication via WebSockets allows you to send interrupt-style updates between the client and the server. The alternative would be to use HTTP polling to continuously check for updates, which is inherently inefficient. Both players could then use WebSockets to send and receive real time updates to the server.
Work Distribution

Project group picture

Zak
zak33@cornell.edu
Developed the game logic, backend, and setup website.

Nadia
nnb28@cornell.edu
Developed the GUI and integration with GPIO; described these in lab report.
Parts List
- Raspberry Pi $0.00 (Provided)
- Raspberry Pi TFT $0.00 (Provided)
- Heroku Deployment Fees $7
Total: $7
References
- Firebase Admin SDK Reference
- bcrypt.js Package Documentation
- requests Package Documentation
- Pygame Documentation
- Explanation of JSON Web Tokens
- JSON
Web Token Tutorial
- Deploying a Git Subdirectory
to Heroku
- R-Pi GPIO Documentation
- OpenAPI Reference
- Building Text Inputs
with Pygame
- Styling
iframe Borders
Code Appendix
Our repo is publicly available here. Additionally, we have attached our code below.
api.py
1 2 3 4 5 6 7 8 9 10 11 12 13 14 15 16 17 18 19 20 21 22 23 24 25 26 27 28 29 30 31 32 33 34 35 36 37 38 39 40 41 42 43 44 45 46 47 48 49 50 51 52 53 54 55 56 57 58 59 60 61 62 63 64 |
#
# zak33, nnb28, 5/17/23: api.py
#
# Interacts with the deployed service to create users, login, and query their
# high scores
#
import requests
# The URL of the service
URL = 'https://ece5725.herokuapp.com'
# Attempts to create a new user with the specified user name and password
# Returns whether the creation of the account was successful
def create_account(username, password):
body = {'username': username, 'password': password}
resp = requests.post(f'{URL}/register', json=body)
return resp.status_code == requests.codes.ok
# An error raised when invalid credentials are entered
class InvalidCredentialsError(Exception):
pass
# Represents a user of 2048
class User:
# Attempt to login with the provided credentials.
# Raises
|
backend/user.ts
1 2 3 4 5 6 7 8 9 10 11 12 13 14 15 16 17 18 19 20 21 22 23 24 25 26 27 28 29 30 31 32 33 34 35 36 37 38 39 40 41 42 43 44 45 46 47 48 49 50 51 52 53 54 55 56 57 58 59 60 61 62 63 64 65 66 67 68 69 70 71 72 73 74 75 76 77 78 79 80 81 82 83 84 85 86 87 88 89 90 91 92 93 94 95 96 97 98 99 100 101 102 103 104 105 106 107 108 109 110 111 112 113 114 115 116 117 118 119 120 121 122 123 124 125 126 127 128 129 130 131 132 133 134 135 136 137 138 139 140 141 142 143 144 145 146 147 148 149 |
import { readFileSync } from 'fs' import { initializeApp, cert } from 'firebase-admin/app' import { getFirestore } from 'firebase-admin/firestore' import { hash, compare } from 'bcryptjs'; import { sign } from 'jsonwebtoken'; /* * zak33, nnb28, 5/17/23: user.ts * * Interacts with the database to create users and query their high scores */ /** The secret key used to access our Firestore */ const serviceAccount = JSON.parse(process.env.SERVICE_ACCOUNT ?? readFileSync('./serviceAccount.json').toString()); const credential = cert(serviceAccount); /** The Firebase app itself */ const app = initializeApp({ credential }) /** The database associated with our Firebase app */ const firestore = getFirestore(app); /** Represents a user in Firestore */ type FirestoreUser = { /** The hashed password of this user */ password: string /** The high score of this user */ score: number } /** The collection of all 2048 userss */ const users = firestore.collection('users') /** A user, as viewed by the API */ type User = { /** The username of this user */ username: string /** This user's plaintext password */ password: string }; /** * Create a new user in the database * * @param user the user to create */ export const createUser = async ({ username, password }: User) => { const userDocRef = users.doc(username) const userDoc = await userDocRef.get(); if (userDoc.exists) { // Do not overwrite existing user throw new Error('User already exists'); } // Create new user await userDocRef.set({ password: await hash(password, 8), score: 0, }) }; /** * Get the high score of a user * * @param username the user's name * @returns The high score of user with username |
backend/index.ts
1 2 3 4 5 6 7 8 9 10 11 12 13 14 15 16 17 18 19 20 21 22 23 24 25 26 27 28 29 30 31 32 33 34 35 36 37 38 39 40 41 42 43 44 45 46 47 48 49 50 51 52 53 54 55 56 57 58 59 60 61 62 63 64 65 66 67 68 69 70 71 72 73 74 75 76 77 78 79 80 81 82 83 84 85 86 87 88 89 90 91 92 93 94 95 96 97 98 99 100 101 102 103 104 105 106 107 108 109 110 111 112 113 114 115 116 117 118 119 120 121 122 123 124 125 126 127 128 129 130 131 132 133 134 135 136 137 138 139 140 141 142 143 144 145 146 147 148 149 150 |
import express from 'express' import { verify } from 'jsonwebtoken'; import { IncorrectPassword, UserNotFound, createUser, highScore, highScores, login, setHighScore } from './user'; import { serve, setup } from 'swagger-ui-express' import docs from './docs.json' /* * zak33, nnb28, 5/17/23: index.ts * * Runs our API to accept and respond to incoming requests */ /** The express application */ const app = express(); // Parse request bodies as JSON app.use(express.json()) // Setup the documentation endpoint app.use('/docs', serve, setup(docs)) /** * Middleware for authenticating an access token and saving it in the * locals of a request. * * @param req The HTTP request * @param res The HTTP response * @param next The next middleware in the application cycle * @returns the reponse */ const validateToken = async (req, res, next) => { const token = req.headers['x-access-token']; if (token == null) { return res.status(401).send("Access token required"); } try { // Get username token was signed with const username = verify(token, process.env.SECRET); // Save username in locals of request res.locals.username = username; } catch { // Token malformed return res.status(403).send("Invalid access token"); } return next(); } // Endpoint for creating an account app.post('/register', async (req, res) => { const { username, password } = req.body; if (username == null || password == null) { // Malformed request body return res.status(400).send("Username and password required"); } try { // Create user in database await createUser({ username, password }); return res.status(200).send("User created"); } catch { // Duplicate user return res.status(400).send("User already exists"); } }); // Endpoint for logging in an obtaining access token app.post('/login', async (req, res) => { const { username, password } = req.body; if (username == null || password == null) { // Malformed request body return res.status(400).send('Username and password required'); } try { // Get access token from logging in const token = await login({ username, password }); // Send it back to user return res.status(200).send({ token }); } catch (e) { if (e instanceof IncorrectPassword) { // User provided incorrect password return res.status(400).send('Incorrect password'); } if (e instanceof UserNotFound) { // User does not exist return res.status(400).send('User not found'); } return res.status(400).send('Invalid credentials'); } }) // Endpoint for updating a user's high score app.post('/high-score', validateToken, async (req, res) => { const { score } = req.body; if (score == null) { // Malformed request body return res.status(400).send("Score required"); } try { // Set high score in database await setHighScore(res.locals.username, score); return res.status(200).send("High score updated"); } catch { // Only occurs when user not found in database return res.status(400).send("User not found"); } }); // Endpoint for retrieving a user's high score app.get('/high-score', validateToken, async (req, res) => { try { // Get score of user associated with access token const score = await highScore(res.locals.username); return res.status(200).send({ score }) } catch { // User not found return res.status(400).send("User not found"); } }); app.get('/high-score/rankings', async (req, res) => { try { const { limit } = req.query; if (limit == null) { // Send back all high scores const scores = await highScores(); return res.status(200).send({ scores }) } if (typeof limit !== 'string') { // limit has incorrect type return res.status(400).send('Limit has incorrect type'); } // Parse string given representing limit const max = parseInt(limit, 10); if (Number.isNaN(max)) { // limit string does not represent number return res.status(400).send('Cannot parse limit'); } const scores = await highScores(max); return res.status(200).send({ scores }) } catch { return res.sendStatus(400); } }); /** The port the app will accept requests from */ const port = process.env.PORT || 8080; app.listen(port, () => { console.log(`Listening on port ${port}`); }) |
game.py
#
  # zak33, nnb28, 5/17/23: game.py
  #
  # The main file to run 2048
  #
  import time
  import pygame
  from pygame.locals import *
  import board
  import login_page
  import leaderboard_page
  import sys

  # import for RPi
  try:
      import RPi.GPIO as GPIO
  except ImportError:
      pass

  pygame.init()

  # constants for screen and colors
  size = width, height = 320, 240
  white = (255, 255, 255)
  black = (0, 0, 0)
  gray = (169, 169, 169)
  screen = pygame.display.set_mode(size)
  clock = pygame.time.Clock()

  # piTFT buttons to be used for playing
  BUTTONS = [22, 27, 17, 23]

  # When set to true, using the TFT
  TFT = False

  # Setting up the buttons on the TFT
  if TFT:
      GPIO.setmode(GPIO.BCM)   # Set for GPIO (bcm) numbering not pin numbers...
      for button in BUTTONS:
          GPIO.setup(button, GPIO.IN, pull_up_down=GPIO.PUD_UP)

  # Connecting the piTFT buttons to directions of shifting the board


  def button_to_dir(button):
      if button == 17:
          return board.Dir.UP
      if button == 22:
          return board.Dir.DOWN
      if button == 23:
          return board.Dir.LEFT
      if button == 27:
          return board.Dir.RIGHT
      return None


  # Initializing the game board
  board_size = 4
  game_board = board.Board()
  game_board.add_tile()
  text_font = game_board.get_font(height, 3)

  # calculating the tile height based on proportions
  tile_height = height // (game_board.side + 1)
  tile_width = width // (game_board.side + 1)
  to_shift = tile_width // 2

  # initializes login page
  login = login_page.Login(width, height, text_font, {
                           "white": white, "black": black, "gray": gray})

  # initializes leaderboard page
  leaderboard = leaderboard_page.Leaderboard(width, height, text_font, white, 7)

  # puts text buttons (Score, New Game, Quit, Top Scores, Logout) into dict
  text_buttons = ["Score: 0", "New Game", "Quit", "Top Scores", "Logout"]
  text_buttons_dict = []
  for i in range(len(text_buttons)):
      text = text_font.render(text_buttons[i], True, white)
      rect = text.get_rect(centerx=width - tile_width +
                           to_shift, y=i * tile_height + to_shift // 2)
      text_buttons_dict.append((text_buttons[i], (text, rect)))
  text_buttons_dict = dict(text_buttons_dict)
  # example format of dictionary
  # {"Quit" : (quit_text, quit_rect)}

  # Connecting the keyboard buttons w, s, a, d buttons to directions of shifting the board


  def key_to_dir(key):
      if key == 'w':
          return board.Dir.UP
      if key == 's':
          return board.Dir.DOWN
      if key == 'a':
          return board.Dir.LEFT
      if key == 'd':
          return board.Dir.RIGHT
      return None


  # Indicators of which screen you are viewing
  quit_clicked = False
  login_screen = True
  topscores_clicked = False
  logout_clicked = False
  # indicates if the game is running
  running = True
  # user to be initialized when logged in
  user = None
  try:
      game_status = (False, "")
      # keep the game running iteratively
      while running and not quit_clicked:
          # clear the screen to draw new components
          screen.fill(black)
          # things to do based on which screen user is on
          if login_screen:
              # draw login screen
              login.draw(screen)
              # log the user in
              user = login.handle_events()
              # if user is logged in, navigate to new screen
              login_screen = user is None
          elif logout_clicked:
              # navigate from game screen to logout screen
              # re-initialize game board and user
              logout_clicked = False
              login_screen = True
              user = None
              game_board = board.Board()
              game_board.add_tile()
          elif topscores_clicked:
              # draw leaderboard
              leaderboard.draw(screen, clock, width, height, text_font, white)
              # if back button clicked, navigate to new screen
              topscores_clicked = not leaderboard.handle_events()
          else:
              # in the game screen
              dir = None
              # find which button clicked on the piTFT
              if TFT:
                  for button in BUTTONS:
                      if not GPIO.input(button):
                          dir = button_to_dir(button)
              # display the screen side buttons
              for text, rect in text_buttons_dict.values():
                  screen.blit(text, rect)
              # draw the 2048 board
              game_board.draw(screen, width, height)
              # check for events
              for event in pygame.event.get():
                  # if key pressed, associate it with a direction
                  if event.type == KEYDOWN:
                      dir = key_to_dir(event.unicode)

                  # if mouse clicked, check if buttons on screen clicked
                  if event.type == MOUSEBUTTONDOWN:
                      quit_clicked = text_buttons_dict["Quit"][1].collidepoint(
                          event.pos)
                      new_game_clicked = text_buttons_dict["New Game"][1].collidepoint(
                          event.pos)
                      topscores_clicked = text_buttons_dict["Top Scores"][1].collidepoint(
                          event.pos)
                      logout_clicked = text_buttons_dict["Logout"][1].collidepoint(
                          event.pos)
                      # re-initializing game if new game button clicked
                      if new_game_clicked:
                          # set score to zero
                          score_text = text_font.render(
                              "Score: 0", True, white)
                          score_rect = score_text.get_rect(centerx=width - tile_width +
                                                           to_shift, y=to_shift // 2)
                          text_buttons_dict["Score"] = (
                              score_text, score_rect)
                          # make new board
                          game_board = board.Board()
                          # add tile to start game
                          game_board.add_tile()
              # if key corresponded to direction, then shift the board
              if dir is not None:
                  if game_board.shift(dir):
                      # shift board and add new tile
                      game_board.add_tile()
                      # change score based on tile collisions
                      # display updated score
                      score_text = text_font.render(
                          "Score: " + str(game_board.score), True, white)
                      score_rect = score_text.get_rect(centerx=width - tile_width +
                                                       to_shift, y=to_shift // 2)
                      text_buttons_dict["Score: 0"] = (
                          score_text, score_rect)
          pygame.display.flip()
          clock.tick(60)
  finally:
      # clean up and end if game is over
      pygame.quit()
      GPIO.cleanup()
board.py
#
# zak33, nnb28, 5/17/23: leaderboard_page.py
#
# The game logic and GUI for the game board of 2048
#
import pygame
import numpy as np
from enum import Enum
import enum
import random


# Represents a cardinal direction
class Dir(Enum):
    UP = enum.auto()
    DOWN = enum.auto()
    LEFT = enum.auto()
    RIGHT = enum.auto()

    # Calculates the angle to 180 degrees, in units of 90 degrees
    def angle_to_left(self):
        if self == Dir.UP:
            return 1
        if self == Dir.DOWN:
            return -1
        if self == Dir.LEFT:
            return 0
        if self == Dir.RIGHT:
            return 2


def create_board(side):
    return np.zeros((side, side), int)

# Filter out the zero elements of a given array, leaving only the nonzero elements


def filter_nonzeros(arr):
    nonzeros = []
    for i in arr:
        if i != 0:
            nonzeros.append(i)
    return nonzeros


# Shifts a row left according to 2048 semantics and returns the resulting row
# Empty tiles are represented with zeros
def shift_row(row):
    nonzeros = filter_nonzeros(row)
    shifted_tiles = []
    i = 1
    while i < len(nonzeros):
        right_tile = nonzeros[i]
        left_tile = nonzeros[i - 1]
        # Try to combine the tiles at index i - 1 and i
        if left_tile == right_tile:
            # If we can merge the tiles, add a doubled tile to the result
            # and bump the index by 2 to consider the next unmerged tile
            shifted_tiles.append(left_tile + 1)
            i += 2
        else:
            # Otherwise, we cannot merge the tile at index i,
            # so we append it to the result unchanged. We bump the counter by
            # 1 to try to merge the tiles at indices i and i + 1
            shifted_tiles.append(left_tile)
            i += 1
    # If we did not merge the second to last and last tile, we have to add the
    # last tile unchanged to the result
    if i == len(nonzeros):
        shifted_tiles.append(nonzeros[-1])
    # We pad the "empty space" created by merging and shifting tiles with empty tiles
    pad_length = len(row) - len(shifted_tiles)
    return np.pad(np.array(shifted_tiles, dtype=np.int64), (0, pad_length), 'constant')

# Shifts a matrix left according to the 2048 semantics


def shift_left(matrix):
    return np.array([shift_row(row) for row in matrix])

# Shifts a matrix in a given direction according to the 2048 semantics


def shift(matrix, dir):
    # Rotate the matrix so we shift left, and then rotate back
    angle = dir.angle_to_left()
    return np.rot90(shift_left(np.rot90(matrix, angle)), -angle)


# RGB of colors to be used in the game
white = (255, 255, 255)
black = (0, 0, 0)
gray = (169, 169, 169)
tile_empty = (204, 192, 179)
tile_2 = (238, 228, 218)
tile_4 = (237, 224, 200)
tile_8 = (242, 177, 121)
tile_16 = (245, 149, 99)
tile_32 = (246, 124, 95)
tile_64 = (246, 94, 59)
tile_128 = (237, 207, 114)
tile_256 = (237, 204, 97)
tile_512 = (237, 200, 80)
tile_1024 = (237, 197, 63)
tile_2048 = (237, 194, 46)

# The index of the colors in here correspond to the tile value exponent
tile_colors = [tile_empty, tile_2, tile_4, tile_8, tile_16, tile_32,
               tile_64, tile_128, tile_256, tile_512, tile_1024, tile_2048]


# Represents a 2048 board
class Board:
    def __init__(self, arg=4):
        if isinstance(arg, int):
            # initalize with side length
            self.side = arg
            self.board = create_board(self.side)
        else:
            # initialize with matrix
            self.side = len(arg)
            self.board = np.array(arg)
        self.score = 0

    def __str__(self):
        return str(np.array([[0 if i == 0 else 2 ** i for i in row] for row in self.board]))

    # Calculates the score difference of the new board and past board
    def score_difference(self, board):
        tiles = list(board.flatten())
        for tile in self.board.flatten():
            if tile in tiles:
                tiles.remove(tile)
        score = 0
        for tile in tiles:
            if tile != 0:
                score += 1 << tile
        return score

    # Shift this 2048 board in place
    def shift(self, dir: Dir):
        shifted = shift(self.board, dir)
        if not np.array_equiv(shifted, self.board):
            self.score += self.score_difference(shifted)
            self.board = shifted
            return True
        return False

    # Returns if the board can shift in direction dir or not
    def can_shift(self, dir):
        return not np.array_equal(self.board, shift(self.board, dir))

    # Returns the exponent (2**exponent) of the tile at location (i, j)
    def at(self, i, j):
        return self.board[i][j]

    # Add a random tile (2 or 4) in random empty spot to the board
    def add_tile(self):
        i = random.randrange(self.side)
        j = random.randrange(self.side)
        v = 1 if random.randint(0, 1) == 0 else 2
        while self.at(i, j) != 0:
            i = random.randrange(self.side)
            j = random.randrange(self.side)
        self.board[i][j] = v

    # Returns the pygame font based on the windows height and size proportion
    def get_font(self, height, size_proportion):
        font_size = height // self.side // size_proportion
        return pygame.font.Font(None, font_size)

    # Draws the current state of the board
    def draw(self, screen, width, height):
        # font setup
        font = self.get_font(height, 2)

        # calculates tile height and width based window size
        tile_height = height // (self.side + 1)
        tile_width = width // (self.side + 1)
        # how much to shift the text in the tiles
        to_shift = tile_width // 2

        # loop through each spot in the board matrix
        for i in range(self.side):
            for j in range(self.side):
                # the tile exponent (2**exponent is the value of the tile)
                tile_exponent = self.at(i, j)
                # the x, y coordinates of the tile on the screen
                tileX = j * tile_width + to_shift
                tileY = i * tile_height + to_shift // 2
                # tile and text color
                tile_color = tile_colors[tile_exponent]
                text_color = white
                # change text color to be more visible if tile has value 2 or 4
                if tile_color == tile_2 or tile_color == tile_4:
                    text_color = gray
                # draw tile
                tile = pygame.draw.rect(screen, tile_color, (tileX - to_shift,
                                                             tileY - to_shift // 2, tile_width, tile_height))

                tile_number = 2 ** tile_exponent
                # if no number, then text is ""]
                tile_text = font.render(str(tile_number), True,
                                        text_color) if tile_number != 1 else font.render("", True,
                                                                                         text_color)
                tile_rect = tile_text.get_rect(centerx=tileX, y=tileY)
                screen.blit(tile_text, tile_rect)
        # Check if game is ended (lost or won)
        game_status = self.end()
        if game_status[0]:
            # Display Lost or Won message
            status_text = font.render(game_status[1], True, text_color)
            status_rect = status_text.get_rect(
                centerx=width // 2, y=height - to_shift)
            screen.blit(status_text, status_rect)

        # draw vertical and horizontal separating lines
        for i in range(2):
            for j in range(self.side + 1):
                if i == 0:  # horizontal
                    pygame.draw.line(
                        screen, white, (0, j * tile_height), (tile_width * self.side, j * tile_height))
                else:  # vertical
                    pygame.draw.line(
                        screen, white, (j * tile_width, 0), (j * tile_width, tile_height * self.side))

    def end(self):
        # check if 2048 tile has been reached
        if 11 in self.board:
            return (True, "YOU WON!!")

        # check if shifting the board in any direction results in no change
        if self.can_shift(Dir.UP) or self.can_shift(Dir.DOWN) or self.can_shift(Dir.LEFT) or self.can_shift(Dir.RIGHT):
            return (False, "")
        else:
            return (True, "You Lost")
test.py
1 2 3 4 5 6 7 8 9 10 11 12 13 14 15 16 17 18 19 |
# zak33, nnb28, 5/17/23: test.py # # Unit testing of game logic # import numpy as np from board import Board import board # Construct an assertion-based test for testing game logic def shift_row_test(expected, input): assert list(board.shift_row(np.array(input))) == expected def test_shift_row(): shift_row_test(expected=[2, 0, 0, 0], input=[1, 1, 0, 0]) shift_row_test(expected=[2, 2, 0, 0], input=[1, 1, 1, 1]) shift_row_test(expected=[2, 0, 0, 0], input=[0, 1, 1, 0]) shift_row_test(expected=[1, 0, 0, 0], input=[0, 0, 1, 0]) shift_row_test(expected=[2, 0, 0, 0], input=[1, 0, 1, 0]) |
leaderboard_page.py
#
# zak33, nnb28, 5/17/23: leaderboard_page.py
#
# Interacts with API to display the top scores using pygame and handles user
# events
#
import time
import pygame
from pygame.locals import *
import board
import api

pygame.init()

# Represents the Leaderboard in 2048


class Leaderboard:
    # creates new leaderboard
    def __init__(self, width, height, font, font_color, limit):
        self.back_text = font.render("Back", True, font_color)
        self.back_rect = self.back_text.get_rect(
            centerx=width // 2, y=height - (height // limit))
        self.limit = limit

    # handles user interaction events with the screen
    def handle_events(self):
        back_clicked = False
        # check to see if back button clicked
        for event in pygame.event.get():
            if event.type == pygame.MOUSEBUTTONDOWN:
                back_clicked = self.back_rect.collidepoint(event.pos)
        return back_clicked

    # draws the leaderboard on the screen with pygame
    def draw(self, screen, clock, width, height, font, font_color):
        # get limit number of scores from api
        all_scores = api.all_high_scores(limit=self.limit)
        i = 0
        # loop through all scores
        for place in all_scores:
            # display the place number (first, second, third place...)
            place_text = font.render(str(i + 1), True, font_color)
            place_rect = place_text.get_rect(
                centerx=width//8, y=((height - (height // self.limit)) * i // self.limit + self.limit))
            screen.blit(place_text, place_rect)
            # display username of the user at this place
            username_text = font.render(
                place["username"], True, font_color)
            username_rect = username_text.get_rect(
                centerx=width // 4, y=((height - (height // self.limit)) * i // self.limit + self.limit))
            # display the highest score of the user at this place
            score_text = font.render(str(place["score"]), True, font_color)
            score_rect = score_text.get_rect(
                centerx=width * 3 // 4, y=(height - (height // self.limit)) * i // self.limit + self.limit)
            screen.blit(username_text, username_rect)
            screen.blit(score_text, score_rect)
            i = i + 1
        # display the back button
        screen.blit(self.back_text, self.back_rect)
login_page.py
#
# zak33, nnb28, 5/17/23: login_page.py
#
# Interacts with API to login users and/or create accounts
#
import time
import pygame
from pygame.locals import *
import board
import api

pygame.init()

# Represents the Login in 2048


class Login:
    # initialize the login screen components
    def __init__(self, width, height, font, colors):
        # initialize the mouse click events to false
        self.login_clicked = False
        self.create_clicked = False
        self.username_clicked = False
        self.password_clicked = False
        self.create_success = False
        self.login_failed = False

        # login / create account screen
        self.width = width
        self.height = height
        self.colors = colors
        self.font = font

        # username / password text boxes
        self.username_text = ''
        self.username_rect = pygame.Rect(
            width // 4, height // 6, width // 2, 32)
        self.password_text = ''
        self.password_rect = pygame.Rect(
            width // 4, height * 2 // 6, width // 2, 32)

        # login button
        self.login_text = font.render("Login", True, colors["white"])
        self.login_rect = self.login_text.get_rect(
            centerx=width // 2, y=height * 3 // 6)

        # create account button
        self.create_text = font.render("Create Account", True, colors["white"])
        self.create_rect = self.create_text.get_rect(
            centerx=width // 2, y=height * 4 // 6)

        # success text for creating account
        self.success_text = font.render("Success!", True, colors["white"])
        self.success_rect = self.success_text.get_rect(
            centerx=width // 2, y=(height * 5 // 6))

        # failed login
        self.login_failed_text = font.render(
            "Incorrect username or password", True, colors["white"])
        self.login_failed_rect = self.login_failed_text.get_rect(
            centerx=width // 2, y=(height * 5 // 6))

    # draws the login screen
    def draw(self, screen):
        # username text box
        username_box_color = self.colors["gray"] if not self.username_clicked else self.colors["white"]
        # draw username textbox
        pygame.draw.rect(screen, username_box_color, self.username_rect)
        # display the current username text entered
        username_surface = self.font.render(
            self.username_text, True, self.colors["black"])
        screen.blit(username_surface,
                    (self.username_rect.x+5, self.username_rect.y+5))
        self.username_rect.w = max(
            self.width // 2, username_surface.get_width()+10)

        # password text box
        password_box_color = self.colors["gray"] if not self.password_clicked else self.colors["white"]
        # draw password textbox
        pygame.draw.rect(screen, password_box_color, self.password_rect)
        # display the current password text entered
        password_surface = self.font.render(
            self.password_text, True, self.colors["black"])
        screen.blit(password_surface,
                    (self.password_rect.x+5, self.password_rect.y+5))
        self.password_rect.w = max(
            self.width // 2, password_surface.get_width()+10)

        # login button
        screen.blit(self.login_text, self.login_rect)
        # create account button
        screen.blit(self.create_text, self.create_rect)
        # if success at creating account, display 'success' message
        if self.create_success:
            screen.blit(self.success_text, self.success_rect)
        elif self.login_failed:
            screen.blit(self.login_failed_text,
                        self.login_failed_rect)

    # handles mousebutton and keyboard press events
    def handle_events(self):
        # loop through every event detected
        for event in pygame.event.get():
            # check mouse clicks
            if event.type == pygame.MOUSEBUTTONDOWN:
                # check if username, password, login, or create account clicked
                self.username_clicked = self.username_rect.collidepoint(
                    event.pos)
                self.password_clicked = self.password_rect.collidepoint(
                    event.pos)
                self.login_clicked = self.login_rect.collidepoint(event.pos)
                # if login clicked, verify user with API
                if self.login_clicked:
                    try:
                        user = api.User(self.username_text, self.password_text)
                        self.login_success = True
                        return user
                    # if invalid user, don't log in
                    except api.InvalidCredentialsError:
                        self.login_clicked = False
                        self.login_failed = True
                        return None
                self.create_clicked = self.create_rect.collidepoint(event.pos)
                # if create account clicked, create using API
                if self.create_clicked:
                    self.create_success = api.create_account(
                        self.username_text, self.password_text)
            # check keyboard clicks
            if event.type == pygame.KEYDOWN:

                # Check for backspace
                if event.key == pygame.K_BACKSPACE:

                    # get text input from 0 to -1 i.e. end.
                    if self.username_clicked:
                        self.username_text = self.username_text[:-1]
                    elif self.password_clicked:
                        self.password_text = self.password_text[:-1]

                # Unicode standard is used for string
                # formation
                else:
                    if self.username_clicked:
                        self.username_text += event.unicode
                    elif self.password_clicked:
                        self.password_text += event.unicode

        return None